The ease with which one may take and distribute digital photographs is universally admired. Regrettably, it is rather simple to inadvertently lose or erase some of these priceless memories.
A large number of valuable photographs may be deleted in the time it takes to hit a single key on a keyboard.
You may have removed an important picture accidentally from the Photos app, deleted a folder of photographs from the Finder app, formatted a partition that consisted of all photos, or you may have discovered that a virus infection deleted your photos on Mac without you even noticing it.
While there are several ways to lose critical photo files, you may wonder if you can recover deleted photos on Mac and protect yourself from experiencing this kind of loss again?
Can You Recover Permanently Deleted Photos on Mac?
Yes, indeed! The photographs may be destroyed because of an inadvertent deletion, a corrupt hard drive, an infection caused by a virus, or a faulty operating system.
Your photographs will always be stored on your MacBook, even if you accidentally erase or lose them. The area that was formerly occupied by them has now been labeled as free storage space.
This indicates that it is possible to recover photos on Mac before they are overwritten by fresh data.
In order to prevent your deleted images from being overwritten and lost forever, please refrain from utilizing the storage device or folder from which they originated.
Once it has been overwritten, there is almost little chance of getting the photographs back.
How to Recover Permanently Deleted Photos on Mac
Method 1: Using third-party a data recovery tool to recover deleted photos
Can you recover permanently deleted photos on Mac with third-party tools?
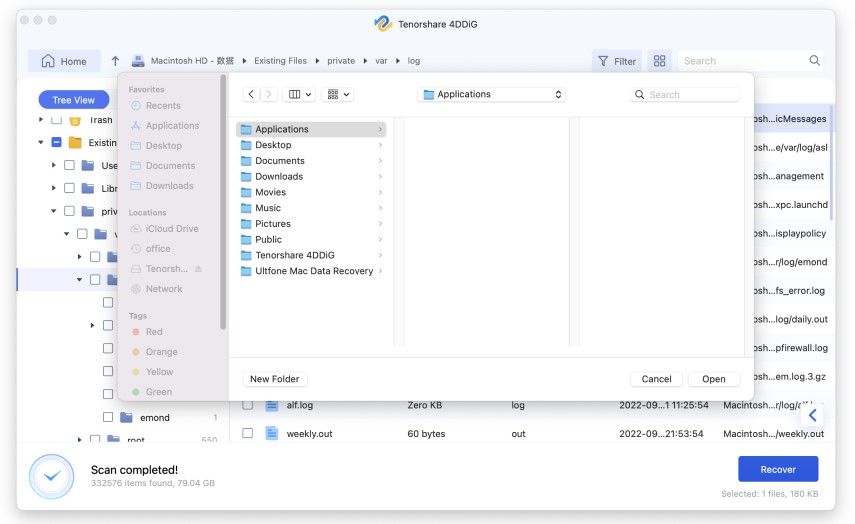
Yes! Indeed, the data recovery program known as Tenorshare 4DDiG Mac Data Recovery is an advanced piece of software that can retrieve every sort of information from your Mac’s internal hard drive or external drives.
This includes photographs, movies, documents, and more. In addition, this program can repair corrupted or damaged video and picture files, as well as recover data from a Mac that has crashed by starting it back up.
You can, in a nutshell, recover anything you’ve lost from your Mac and any other devices that run on the Mac operating system, including USB drives, SD cards, and digital cameras, in just three simple steps.
There is support for the T2 chip, as well as the M1, M1 Pro, M1 Max, and macOS Ventura.
Photos from well-known camera manufacturers like Nikon, Canon, Sony, Olympus, and others can be repaired with this software.
It is also compatible with videos in high resolutions and formats such as 4K, 8K, 12K, HD, UHD, Full HD, H.265, and HEVC.
So, how to recover permanently deleted photos on Mac via the Tenorshare 4DDiG Mac Data Recovery tool?
Step 1: After the installation is complete, start the Mac data recovery process by launching 4DDiG-Mac and choosing a destination such as your local disks.
When you move the mouse pointer over the area you want to scan, a little icon with the word ‘Scan’ will appear in the corner to the right. Simply clicking will get the process underway.
Step 2: You will now scan for potentially missing picture files and preview them. It takes some time to go through all the deleted files.
After the program has shown the results, you will be able to choose individual file types by clicking on them to get a preview of further data and to filter photographs depending on the selected file type.
Step 3: In the end, click the “Recover” button to recover files from your Mac, and then choose a place to store the recovered files. This should be a different location from the one you used before, and it should be readily searchable.
Method 2: Get photos back from Your recently deleted folder
When you deleted the photos, if you were using iPhoto or the Apple Photo program at the time, they may be still stored in the ‘Recently Deleted Folder’.
How to recover deleted photos on Mac from there then? Deleted photographs and videos will stay in this folder for 30 days after they have been removed.
During this time, they may be readily recovered by following the instructions outlined in the next paragraph.
Step 1: Launch the app for taking photos.
Step 2: Select Recently Deleted from the menu on the left of the window.
Step 3: Choose the pictures that you would want to have back.
Step 4: To retrieve the photographs that were accidentally erased, use the ‘Recover’ option.
Method 3: Retrieve deleted images via trash
If the images were deleted from another software or if they are not located in the folder labeled ‘Recently Deleted’, the Mac Trash Bin is the next place you should check for them.
A unique folder known as the Trash Bin is used to temporarily retain recently deleted files and directories for thirty days or until the bin is properly emptied.
So, how to recover deleted photos on Mac after 30 days via Mac Trash bin?
You may retrieve deleted images or any other data that are located in the Trash Bin by following the technique that is outlined below.
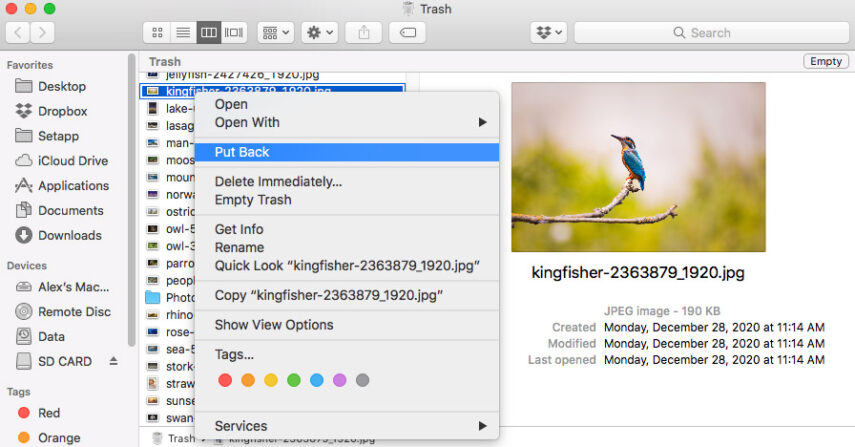
Step 1: Simply clicking on the symbol of the Trash will bring up the Trash.
Step 2: Discover the location of the thing you need to retrieve.
Step 3: You may restore the file to its previous place by right-clicking on it and selecting the Put Back option.
Method 4: Restore deleted pictures via local backup
You need to make regular backups of the information stored on your computer, and this includes your pictures. Time Machine is a useful backup and restoration application that comes preinstalled on every Mac.
If you have previously used Time Machine to back up your images, it will not be difficult for you to restore them. Follow these instructions to learn how to recover lost photos on mac from a Time Machine backup.
Step 1: Connect to your computer the storage device, whether it be a USB drive or any other kind, that stores the Time Machine backup.
Step 2: Open a new window in Finder that shows the storage place where the data that was lost was most recently saved.
Step 3: To launch Time Machine, choose the symbol that represents it on the menu bar and click it.
Step 4: You may search through the local snapshots and backups using the arrows and timeline that are provided by Time Machine until you discover the photographs that you wish to restore.
Step 5: Following the completion of your choices, click the Restore option. The photographs will be returned to the places where they were originally taken.
Method 5: Find deleted photos with iCloud
Photos that you keep in iCloud may be recovered like the previous methods. To recover photos on Mac from iCloud, apply the technique below.
Step 1: Sign in your iCloud account.
Step 2: Open iCloud Photos.
Step 3: In the sidebar, choose the Recently Deleted album.
Step 4: Choose the images you wish to download.
Step 5: Then click ‘Recover’ from the menu.
How to Avoid Photos Loss Once Again
Backups are crucial. Time Machine is accessible and prepared for usage. To store the backups, all you need is an external hard drive.
To guarantee the correct subject is being formatted, formatting should only be undertaken after careful deliberation and thorough checking.
Malware infection may cause a variety of issues, including the loss of crucial pictures. Hence, use an antivirus application to stay away from these scenarios.
Conclusion
We hope that you have learned how to recover deleted photos on Mac with several methods mentioned in this article.
Yet, we can assure you that for permanently deleted photos on Mac, the most reliable method to recover photos on Mac is a professional data recovery tool like Tenorshare 4DDiG.
Because in this way, you can make deep repairs and recoveries on Mac for different Mac versions as well as you can also repair professional camera files and more.
Tenorshare also has a detailed guide on how to recover deleted photos on a Mac quickly that can be checked out here.
Disclaimer: This is a sponsored post, made possible in association with Tenorshare. PiunikaWeb doesn’t take any responsibility of the product being advertised here.
About Tenorshare: Founded in 2007, Tenorshare provides solutions for data recovery, device content management, password recovery, system repair, and other mobile phone and computer essentials.
PiunikaWeb started as purely an investigative tech journalism website with main focus on ‘breaking’ or ‘exclusive’ news. In no time, our stories got picked up by the likes of Forbes, Foxnews, Gizmodo, TechCrunch, Engadget, The Verge, Macrumors, and many others. Want to know more about us? Head here.

